Handling UI state with Redux
In the previous post I illustrated how it’s possible to handle UI state using a Finite-state Machine.
For many common scenarios in mobile applications implementing a full fledged FSM may be overkill. This is because the number of states we usually deal with is relatively small and this doesn’t quite justify the additional code and complexity that the FSM requires.
Another possible approach to properly handle state, with potentially less overhead, is to leverage a Redux state container.
In this post I’m going to present a very simplistic Redux based state container implementation. This approach allows to take advantage of Redux prescriptive approach to state management while avoiding the additional complexity of having to introduce middleware and side effects. I’ll be starting from the basic login screen Swift code from the previous post to illustrate the aforementioned approach.
Redux and asynchronous calls: Side effects
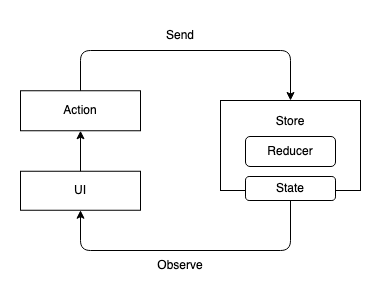
The core tenet of Redux (and most other unidirectional flow patterns in general) is that state management should happen in the context of a single method (called reducer in this case):
reduce: (State, Action) -> State
Such a method is implemented inside a Store that basically acts as a wrapper for the state and its handling logic.
This is very similar to what we saw for a FSM, aside from some different terminology: Redux uses the term Action instead of Event to describe the trigger of a state transition. The state is initialized with a specific value and then each Action can trigger the transition to a new State value.
So far so good: The reducer handles state transitions synchronously and it’s easy to understand. But how is it possible to handle asynchronous logic, like making an API call or invoking an OS callback, in the context of Redux? For this scenario, Redux introduces the concept of middleware and side effects:
By itself, a Redux store doesn’t know anything about async logic. It only knows how to synchronously dispatch actions, update the state by calling the root reducer function, and notify the UI that something has changed. Any asynchronicity has to happen outside the store.
The store can implement multiple middleware and side effects methods to define how to handle asynchronous logic:
Redux middleware provides a third-party extension point between dispatching an action, and the moment it reaches the reducer. People use Redux middleware for logging, crash reporting, talking to an asynchronous API, routing, and more.
A “side effect” is any change to state or behavior that can be seen outside of returning a value from a function.
Now, this sounds pretty cool. And it can actually be a very powerful mechanism to allow injecting custom behavior in libraries (many networking libraries, for instance, indeed leverage this approach).
But if your use case is much simpler, as it’s common in the context of mobile applications UI, the extra complexity of handing middleware and side effects is probably not worth. Among other things because it usually ends up making the code harder to read, test, and reason about.
A simplified Redux approach: No middleware, no side effects
So, let’s ignore middleware and side effects and see how we can directly handle asynchronous logic in the context of a reducer. One simple way to achieve this is, for instance, to force the reducer to always return the new state asynchronously:
reduce(State, Action) async -> State
This, as usually happens, is a trade off: Now we’re forced to handle all state transitions asynchronously, even those that are inherently synchronous. Personally, though, I find the simplicity of this approach is a good enough reason to justify this compromise.
Let’s now take a look at a possible implementation of the above simplistic approach to a Redux based state container:
protocol Store: ObservableObject {
    associatedtype State
    associatedtype Action

    var state: CurrentValueSubject<State, Never> { get set }
    func reduce(state: State, action: Action) async -> State
}

extension Store {
    func send(_ action: Action) {
        Task {
            state.value = await reduce(state: state.value, action: action)
        }
    }
}
The Store definition is pretty straightforward, with the generic reducer asynchronous method signature func reduce(state: State, action: Action) async -> State and the Combine based observable state. The send method (I personally prefer send to the Redux dispatch method name) allows to process an Action and perform any required state transition.
Modeling the login logic with a Redux Store
The required elements to define our login logic using Redux are states and actions:
enum LoginState {
    case idle
    case validatingCredentials
    case validCredentials
    case authenticating
    case authenticated
    case failure(LoginError)
}
enum LoginError: Error {
    case invalidCredentials
    case networkError(Error)
}
enum LoginAction {
    case enteringCredential(LoginCredential)
    case authenticate
    case ackError
}
enum LoginCredential {
    case username(String)
    case password(String)
}
NOTE: Besides some naming differences (
Actioninstead ofEvent) this code is pretty much the same used for the FSM implementation in the previous post.
And, finally, here’s the implementation for our Redux based login store:
class LoginStore: Store {
    @Published var state: CurrentValueSubject<LoginState, Never> = .init(.idle)

    private var hasValidUsername = false
    private var hasValidPassword = false
    private var hasValidCredentials: Bool {
        return hasValidUsername && hasValidPassword
    }

    func reduce(state: LoginState, action: LoginAction) async -> LoginState {
        let hasActiveError = {
            if case .failure(_) = state {
                return true
            }
            return false
        }()

        var newState = state

        switch action {
        case .enteringCredential(let credential):
            switch credential {
            case .username(let value):
                hasValidUsername = validateUsername(value)
                if !hasActiveError {
                    if hasValidCredentials {
                        newState = .validCredentials
                    } else {
                        newState = .validatingCredentials
                    }
                }
            case .password(let value):
                hasValidPassword = validatePassword(value)
                if !hasActiveError {
                    if hasValidCredentials {
                        newState = .validCredentials
                    } else {
                        newState = .validatingCredentials
                    }
                }
            }
        case .authenticate:
            newState = .authenticating
            // Simulate network call
            // since we're not using a real
            // authentication service
            DispatchQueue.global(qos: .background).asyncAfter(deadline: .now() + 2.0) { [weak self] in
                guard let self else { return }
                DispatchQueue.main.async {
                    self.state.send(.authenticated)
                }
            }
        case .ackError:
            newState = .validCredentials
        }
        return newState
    }

    private func validateUsername(_ value: String) -> Bool {
        // Way too simple `username` validation
        // for illustration purposes only
        return value.count >= 8
    }

    private func validatePassword(_ value: String) -> Bool {
        // Way too simple `password` validation
        // for illustration purposes only
        return value.count >= 8
    }
}
The code is pretty straightforward. The observable state is initialized to the idle value and then the reducer takes care of handling actions and returning the updated state asynchronously. The only state that actually requires an asynchronous computation (supposedly to make an API call, simulated using a delay in the current sample) is authenticate. For every other state, the new value is immediately returned - technically it’s still done asynchronously, but there’s no additional delay other than dispatching it on the DispatchQueue or RunLoop that’s observing the state.
Leveraging the Redux Store in the login logic
Now that the login logic has been implemented by means of a Redux Store (LoginStore), the next step is to wrap it inside a view model. The latter will act as an intermediary between the screen (view) and the Store and will expose just a few properties that will drive the UI behavior.
Here’s the full view model code:
class LoginViewModel: ObservableObject {
    @Published var username = ""
    @Published var password = ""
    @Published var hasValidCredentials = false
    @Published var isLoading = false
    @Published var isAuthenticated = false
    @Published var error: LoginError?

    private var store: LoginStore
    private var cancellables: Set<AnyCancellable> = []

    init(store: LoginStore) {
        self.store = store
        setupSubscriptions()
    }

    func authenticate() {
        store.send(.authenticate)
    }

    func ackError() {
        store.send(.ackError)
    }

    private func setupSubscriptions() {
        $username.sink { [weak self] value in
            guard let self else { return }
            self.store.send(.enteringCredential(.username(value)))
        }
        .store(in: &cancellables)

        $password.sink { [weak self] value in
            guard let self else { return }
            self.store.send(.enteringCredential(.password(value)))
        }
        .store(in: &cancellables)

        store.state
            .receive(on: DispatchQueue.main)
            .sink { [weak self] state in
            guard let self else { return }
            self.hasValidCredentials = (state == .validCredentials)
            self.isLoading = (state == .authenticating)
            self.isAuthenticated = (state == .authenticated)
            if case let .failure(error) = state {
                self.error = error
            } else {
                self.error = nil
            }
        }
        .store(in: &cancellables)
    }
}
NOTE: Aside from the differences in using a Redux Store versus a FSM, all the following code is pretty much the same as in the FSM implementation of the previous post.
The core of the view model logic is the setupSubscriptions() method, which is responsible for:
- detecting changes to the
usernameandpasswordproperties, based on the user input, to perform the necessary credential validation (by means of the Redux Store). - detecting changes to the Redux Store
stateto publish the observable properties that will drive the UI behavior.
The authenticate() and ackError() methods allow the UI to send actions to the Redux Store, respectively, when the user taps the Sign In button and when an error is displayed to the user.
The last step is to wire up the login screen (a SwiftUI view) to the view model.
Here’s the full view code:
struct LoginView: View {
    @ObservedObject private var viewModel: LoginViewModel
    @State private var shouldShowError: Bool = false

    init(viewModel: LoginViewModel) {
        self.viewModel = viewModel
    }

    private func isSignInButtonDisabled() -> Bool {
        guard !viewModel.isLoading else { return true }
        return !viewModel.hasValidCredentials
    }

    var body: some View {
        VStack {
            GroupBox {
                TextField("Username", text: $viewModel.username)
                    .textFieldStyle(.roundedBorder)
                SecureField("Password", text: $viewModel.password)
                    .textFieldStyle(.roundedBorder)
                Button("Sign In") {
                    viewModel.authenticate()
                }
                .buttonStyle(DefaultPrimaryButtonStyle(disabled: isSignInButtonDisabled()))
            }
            .padding(.horizontal)
            .fullScreenCover(isPresented: $viewModel.isLoading) {
                ProgressView()
                    .background(BackgroundBlurView())
            }
        }
        .alert(isPresented: $shouldShowError) {
            Alert(
                title: Text("Error"),
                message: Text(viewModel.error?.localizedDescription ?? "Unknown error"),
                dismissButton: .default(Text("OK")) {
                    viewModel.ackError()
                }
            )
        }
        .onChange(of: viewModel.error) { error in
            // Make sure the full screen spinner is
            // dismissed before showing the alert.
            DispatchQueue.main.asyncAfter(deadline: .now() + 0.5) {
                shouldShowError = (error != nil) && !viewModel.isLoading
            }
        }
        .padding()
    }
}
As shown in the above code, the view is rather simple and uses the view model to interact with the Redux Store and implement all the required behavior.
Conclusion
In this post, I illustrated how it’s possible to handle UI state using a very simplistic Redux based state container implementation. This approach allows us to take advantage of Redux prescriptive approach to state management to make the code easier to read, test, and reason about, without the overhead of having to introduce middleware and side effects.
The full code is available on GitHub.