Handling UI state with Finite-state Machines
Properly handling state is one of the most important tasks when developing software. This is especially true when dealing with complex functionality. In the context of frontend development, handling UI state is very critical as it directly affects the user experience.
In software development, Finite-state Machines have been successfully used to model complex systems for many decades.
In this post I’m going to illustrate how we can leverage a Finite-state Machine (FSM) to handle a basic login screen for an iOS app. While the FSM code will be in Swift, the approach is rather generic and could be easily replicated for different languages and platforms (like Android and Web, for instance). This is what the final result will look like:
Modeling the login screen with a FSM
Let’s start by modeling the login screen with a FSM. The required elements to define a FSM are:
- states
- events (which will be responsible for triggering a state transition)
We’ll be using enums for both the states and the events since these are invariant.
These are the states defined for our FSM:
enum LoginState {
    case idle
    case validatingCredentials
    case validCredentials
    case authenticating
    case authenticated
    case error(LoginError)
}
The error state has two possible values, depending on the error cause:
enum LoginError: Error {
    case invalidCredentials
    case networkError(Error)
}
Most state transitions will be driven by user events. Since user authentication requires an API call, though, some transitions will be triggered automatically by our code in response to network events.
These are the events handled by our FSM:
enum LoginEvent {
    case enteringCredential(LoginCredential)
    case authenticate
    case ackError
}
We need to further specify what credential item is being entered, since we need both username and password:
enum LoginCredential {
    case username(String)
    case password(String)
}
Now that we have defined all the required elements, we can take a look at the state diagram for our login FSM:
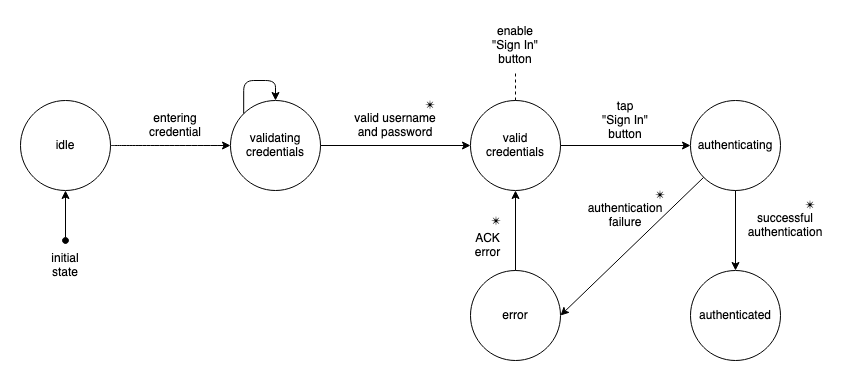
NOTES:
- We could have chosen to model the login FSM differently, both for states and events. This particular model is one I used a few times in the past and found rather effective.
- The transitions marked with
✴are automatically triggered by our code, instead of being driven by some user input.- Our FSM will also perform some side effects, identified by a dashed line in the diagram, as a result of specific state transitions.
Implementing our login FSM logic
As shown in the state diagram, transitions between states are driven by a specific event. To make sure we properly handle events and perform transitions only when they are valid, we’ll introduce a method that tells us if a specific event is allowed, and can be processed, for the current state of our FSM:
enum LoginState {
    [...]

    func canProcessEvent(event: LoginEvent) -> Bool {
        switch event {
        case .enteringCredential(_):
            return self == .idle ||
            self == .validatingCredentials ||
            self == .validCredentials
        case .authenticate:
            return self == .validCredentials
        }
        case .ackError:
            if case .error(_) = self {
                return true
            } else {
                return false
            }
        }
    }

    [...]
}
With the above in place, we can now process an event and, when valid for the current FSM state, perform the required transition as illustrated in the following code:
enum LoginState {
    [...]

    private var hasValidUsername = false
    private var hasValidPassword = false
    private var hasValidCredentials: Bool {
        return hasValidUsername && hasValidPassword
    }

    [...]

    func processEvent(_ event: LoginEvent) -> Bool {
        guard state.canProcessEvent(event: event) else {
            return false
        }

        switch event {
        case .enteringCredential(let credential):
            switch credential {
            case .username(let value):
                hasValidUsername = validateUsername(value)
                if hasValidCredentials {
                    state = .validCredentials
                } else {
                    state = .validatingCredentials
                }
            case .password(let value):
                hasValidPassword = validatePassword(value)
                if hasValidCredentials {
                    state = .validCredentials
                } else {
                    state = .validatingCredentials
                }
            }
        case .authenticate:
            state = .authenticating
            // Simulate network call
            // since we're not using a real
            // authentication service
            DispatchQueue.main.asyncAfter(deadline: .now() + 2.0) { [weak self] in
                guard let self else { return }
                self.state = .authenticated
            }
        }
        case .ackError:
            state = .idle
        return false
    }

    private func validateUsername(_ value: String) -> Bool {
        // Way too simple `username` validation
        // for illustration purposes only
        return value.count >= 8
    }

    private func validatePassword(_ value: String) -> Bool {
        // Way too simple `password` validation
        // for illustration purposes only
        return value.count >= 8
    }

    [...]
}
As illustrated in the above code, and in the state diagram, our FSM code is performing a side effect to enable the Sign In button when the current state is validCredentials (i.e.: when both the username and password field have been successfully validated, which corresponds to the validatingCredentials → validCredentials state transition).
Leveraging the FSM in our login screen
The next step to leverage the FSM in our screen is to wrap it inside a view model. The latter will act as an intermediary between the screen (view) and the FSM and will expose just a few properties that will drive the UI behavior. This will make our code easier to test and better decoupled: In case we end up changing the FSM implementation in the future, we’ll only need to update the view model while the view (login screen) will require no changes.
Here’s the full view model code:
class LoginViewModel: ObservableObject {
    @Published var username = ""
    @Published var password = ""
    @Published var hasValidCredentials = false
    @Published var isLoading = false
    @Published var isAuthenticated = false
    @Published var error: LoginError?

    private var fsm: LoginFSM
    private var cancellables: Set<AnyCancellable> = []

    init(fsm: LoginFSM) {
        self.fsm = fsm
        setupSubscriptions()
    }

    func authenticate() {
        fsm.processEvent(.authenticate)
    }

    func ackError() {
        fsm.processEvent(.ackError)
    }

    private func setupSubscriptions() {
        $username.sink { [weak self] value in
            guard let self else { return }
            self.fsm.processEvent(.enteringCredential(.username(value)))
        }
        .store(in: &cancellables)

        $password.sink { [weak self] value in
            guard let self else { return }
            self.fsm.processEvent(.enteringCredential(.password(value)))
        }
        .store(in: &cancellables)

        fsm.$state.sink { [weak self] state in
            guard let self else { return }
            self.hasValidCredentials = (state == .validCredentials)
            self.isLoading = (state == .authenticating)
            self.isAuthenticated = (state == .authenticated)
            if case let .error(error) = state {
                self.error = error
            } else {
                self.error = nil
            }
        }
        .store(in: &cancellables)
    }
}
The core of the view model logic is the setupSubscriptions() method, which is responsible for:
- detecting changes to
usernameandpasswordproperties, based on the user input, to perform the necessary credential validation (by means of the FSM). - detecting changes to the FSM
stateto publish the observable properties that will drive the UI behavior.
The authenticate() and ackError() methods allow the UI to send events to the FSM, respectively, when the user taps the Sign In button and when an error is displayed to the user.
The last step is to wire up the login screen (a SwiftUI view) to the view model.
Here’s the full view code:
struct LoginView: View {
    @ObservedObject private var viewModel: LoginViewModel
    @State private var shouldShowError: Bool = false

    init(viewModel: LoginViewModel) {
        self.viewModel = viewModel
    }

    private func isSignInButtonDisabled() -> Bool {
        guard !viewModel.isLoading else { return true }
        return !viewModel.hasValidCredentials
    }

    var body: some View {
        VStack {
            GroupBox {
                TextField("Username", text: $viewModel.username)
                    .textFieldStyle(.roundedBorder)
                SecureField("Password", text: $viewModel.password)
                    .textFieldStyle(.roundedBorder)
                Button("Sign In") {
                    viewModel.authenticate()
                }
                .buttonStyle(DefaultPrimaryButtonStyle(disabled: isSignInButtonDisabled()))
            }
            .padding(.horizontal)
            .fullScreenCover(isPresented: $viewModel.isLoading) {
                ProgressView()
                    .background(BackgroundBlurView())
            }
        }
        .alert(isPresented: $shouldShowError) {
            Alert(
                title: Text("Error"),
                message: Text(viewModel.error?.localizedDescription ?? "Unknown error"),
                dismissButton: .default(Text("OK")) {
                    viewModel.ackError()
                }
            )
        }
        .onChange(of: viewModel.error) { error in
            // Make sure the full screen spinner is
            // dismissed before showing the alert.
            DispatchQueue.main.asyncAfter(deadline: .now() + 0.5) {
                shouldShowError = (error != nil) && !viewModel.isLoading
            }
        }
        .padding()
    }
}
As shown in the above code, the view is rather simple and uses the view model to interact with the FSM and implement all the required behavior.
Conclusion
In this post, I illustrated how it’s possible to handle UI state using a Finite-state Machine. This approach should make the code easier to read and test, and also more robust since we created a well defined model for the UI behavior that should be easier to reason about.
The full code is available on GitHub.