Programmatic Views in Swift: Parallax and Scale
After using Storyboards for many years, I recently decided to switch to Programmatic Views and Programmatic Autolayout for my personal projects.
There are a few reasons behind such a choice, the main one being that Programmatic Views make it easier to create reusable UI components. Without any dependency on a Storyboard or XIB file it’s much easier to:
-
Extend UI components with new functionality.
-
Redistribute your components through a Framework.
In this post I’m going to introduce Programmatic Views and Programmatic Autolayout and I’ll do that by building a fun and challenging UI feature: Parallax and Scale effects for a view controller header. This is what the final result will look like:
Without further ado, let’s start our journey into implementing the above effect(s).
Part I: Programmatic Views
In this section I’m going to illustrate how to work with Programmatic Views when creating a new project. Refactoring an older project to use Programmatic Views is definitely possible but it usually takes quite a bit of effort and would require its own post.
Step 1: Getting rid of Storyboards
The first step to start using Programmatic Views is to get rid of Storyboards. Let’s create a brand new Xcode project and name it ParallaxAndScale. Now, we need just a few steps to remove the dependency on Storyboards:
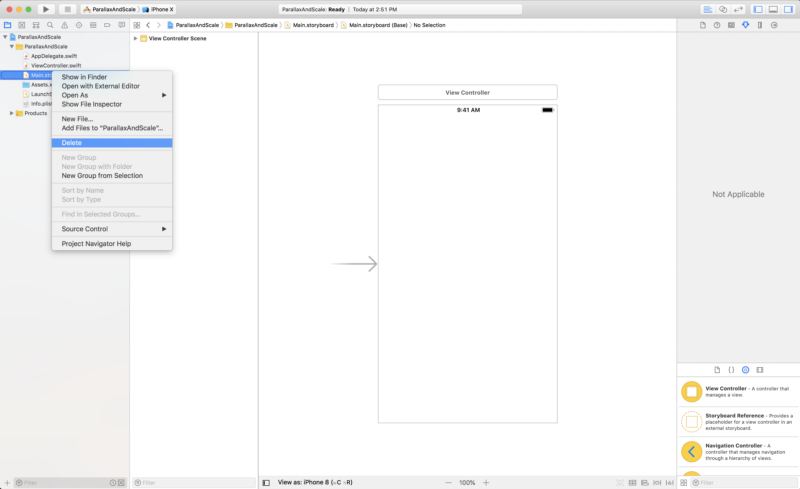
- Remove the automatically generated main Storyboard (
Main.storyboard).
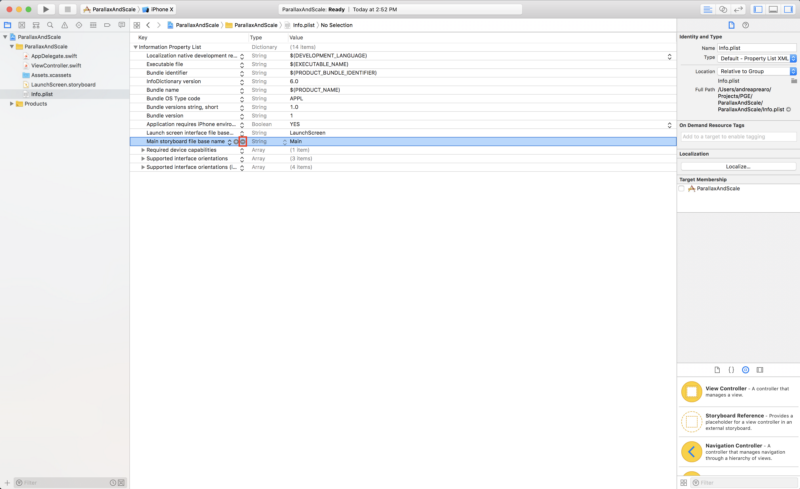
- Remove the
Main storyboard file base namekey inInfo.plist.
- Modify
AppDelegate.swiftto programmatically instantiate the main view controller. I also usually rename the automatically createdViewController.swifttoMainViewController.swift.
import UIKit

@UIApplicationMain
class AppDelegate: UIResponder, UIApplicationDelegate {
    var window: UIWindow?

    func application(_ application: UIApplication, didFinishLaunchingWithOptions launchOptions: [UIApplicationLaunchOptionsKey: Any]?) -> Bool {
        instantiateMainViewController()
        return true
    }
}

private extension AppDelegate {
    private func instantiateMainViewController() {
        let mainViewController = MainViewController()
        window = UIWindow(frame: UIScreen.main.bounds)
        window?.rootViewController = mainViewController
        window?.makeKeyAndVisible()
    }
}
We’ll keep the LaunchScreen.storyboard because it’s required to be able to correctly launch the app.
Now, we are free from dependencies on Storyboards and ready to fully exploit Programmatic Views. To implement our Parallax and Scale effects we are going to place the following views inside the main view controller:
// A scroll view to allow the user to scroll up and down to trigger, respectively:
// - the parallax effect.
// - the scale effect.
private var scrollView: UIScrollView!

// A header view containing the image to perform the above effects on.
// In order to correctly apply the effects the header needs to be implemented using:
// - a container view.
// - a contained image view.
private var headerContainerView: UIView!
private var headerImageView: UIImageView!

// A view that takes up the rest of the screen
// and will host any additional content we need.
// For the sake of this sample, a UILabel would suffice.
private var label: UILabel!
We are also going to need a few constraint references to make the UI behave appropriately as the layout changes (when the user triggers a specific effect by scrolling up or down):
// This will reference the header view container top constraint
private var headerTopConstraint: NSLayoutConstraint!

// This will reference the header view container height constraint
private var headerHeightConstraint: NSLayoutConstraint!
Step 2: Programmatically creating the views
For this step I like to wrap the code to programmatically create each view into its own private method. This is not strictly required but I think it makes the code cleaner and easier to read. I also like to adopt a functional approach and have each method return the view instance it creates. Such instances will then be appropriately added to the view controller before it gets shown.
func createScrollView() -> UIScrollView {
    let scrollView = UIScrollView()
    scrollView.delegate = self
    scrollView.alwaysBounceVertical = true
    scrollView.translatesAutoresizingMaskIntoConstraints = false
    return scrollView
}

func createHeaderContainerView() -> UIView {
    let view = UIView()
    view.clipsToBounds = true
    view.translatesAutoresizingMaskIntoConstraints = false
    return view
}

func createHeaderImageView() -> UIImageView {
    let imageView = UIImageView()
    imageView.translatesAutoresizingMaskIntoConstraints = false
    imageView.contentMode = .scaleAspectFill
    if let image = UIImage(named: "Coffee") {
        imageView.image = image
    }
    imageView.clipsToBounds = true
    return imageView
}

func createLabel() -> UILabel {
    let label = UILabel()
    label.translatesAutoresizingMaskIntoConstraints = false
    label.backgroundColor = .white
    let titleFont = UIFont.preferredFont(forTextStyle: .title1)
    if let boldDescriptor = titleFont.fontDescriptor.withSymbolicTraits(.traitBold) {
        label.font = UIFont(descriptor: boldDescriptor, size: 0)
    } else {
        label.font = titleFont
    }
    label.textAlignment = .center
    label.adjustsFontForContentSizeCategory = true
    label.text = "Your content here"
    return label
}
Step 3: Programmatically setting Autolayout constraints
The code to set Autolayout constraints can be put in a single method (arrangeConstraints()) or split into a set of private methods, one for each view. For this particular use case we don’t need too many constrains so wrapping all Autolayout code into a single method should be good enough:
func arrangeConstraints() {
    let scrollViewConstraints: [NSLayoutConstraint] = [
        scrollView.topAnchor
            .constraint(equalTo: view.topAnchor),
        scrollView.leadingAnchor
            .constraint(equalTo: view.leadingAnchor),
        scrollView.trailingAnchor
            .constraint(equalTo: view.trailingAnchor),
        scrollView.bottomAnchor
            .constraint(equalTo: view.bottomAnchor)
    ]
    NSLayoutConstraint.activate(scrollViewConstraints)

    headerTopConstraint = headerContainerView.topAnchor
        .constraint(equalTo: view.topAnchor)
    headerHeightConstraint = headerContainerView.heightAnchor
        .constraint(equalToConstant: 210)
    let headerContainerViewConstraints: [NSLayoutConstraint] = [
        headerTopConstraint,
        headerContainerView.widthAnchor
            .constraint(equalTo: scrollView.widthAnchor, multiplier: 1.0),
        headerHeightConstraint
    ]
    NSLayoutConstraint.activate(headerContainerViewConstraints)

    let headerImageViewConstraints: [NSLayoutConstraint] = [
        headerImageView.topAnchor
            .constraint(equalTo: headerContainerView.topAnchor),
        headerImageView.leadingAnchor
            .constraint(equalTo: headerContainerView.leadingAnchor),
        headerImageView.trailingAnchor
            .constraint(equalTo: headerContainerView.trailingAnchor),
        headerImageView.bottomAnchor
            .constraint(equalTo: headerContainerView.bottomAnchor)
    ]
    NSLayoutConstraint.activate(headerImageViewConstraints)

    let labelConstraints: [NSLayoutConstraint] = [
        label.topAnchor
            .constraint(equalTo: headerContainerView.bottomAnchor),
        label.widthAnchor
            .constraint(equalTo: scrollView.widthAnchor, multiplier: 1.0),
        label.heightAnchor
            .constraint(equalToConstant: 800)
    ]
    NSLayoutConstraint.activate(labelConstraints)
}
Step 4: Combining Programmatic Views and Programmatic Autolayout
Now that we have our basic blocks ready, let’s take a look at how we can combine them to make sure we correctly display the main view controller and its content:
import UIKit

class MainViewController: UIViewController {
    // MARK: - Constants
    struct Constants {
        static fileprivate let headerHeight: CGFloat = 210
    }

    // MARK: - Properties
    private var scrollView: UIScrollView!
    private var label: UILabel!
    private var headerContainerView: UIView!
    private var headerImageView: UIImageView!
    private var headerTopConstraint: NSLayoutConstraint!
    private var headerHeightConstraint: NSLayoutConstraint!

    override func viewDidLoad() {
        super.viewDidLoad()

        scrollView = createScrollView()
        headerContainerView = createHeaderContainerView()
        headerImageView = createHeaderImageView()
        label = createLabel()

        headerContainerView.addSubview(headerImageView)
        scrollView.addSubview(headerContainerView)
        scrollView.addSubview(label)
        view.addSubview(scrollView)

        arrangeConstraints()
    }
}
Inside viewDidLoad we first create the views, then properly add them to the view controller and finally set the Autolayout constraints.
WARNING: Remember to add your views to the main view controller before calling the code to set the constraints! If you don’t do that the app will crash because Autolayout is not able to find the expected view hierarchy and you’ll see an error message similar to the following:
*** Terminating app due to uncaught exception 'NSGenericException', reason: 'Unable to activate constraint with anchors <NSLayoutYAxisAnchor:0x608000268d00 "UILabel:0x7fd8a1b04890'Your content here'.top"> and <NSLayoutYAxisAnchor:0x608000268980 "UIView:0x7fd89fc19d30.bottom"> because they have no common ancestor. Does the constraint or its anchors reference items in different view hierarchies? That's illegal.'
Part II: Parallax and Scale effects
In this section I’ll illustrate how to implement the Parallax and Scale effects. There are a few different ways to implement such effects. I chose the particular solution that follows because it’s easy to implement with Programmatic Views and Programmatic Autolayout and works reasonably well.
Step 1: Referencing header Autolayout constraints
The effects we want to create require to dynamically change some constraint at runtime. In particular, as the user is scrolling we are going to change the following constraints:
-
Header view container top constraint (
headerTopConstraint). -
Header view container height constraint (
headerHeightConstraint).
Here’s the relevant portions of the main view controller where we are capturing a reference to those constraints:
class MainViewController: UIViewController {
    [...]
    private var headerTopConstraint: NSLayoutConstraint!
    private var headerHeightConstraint: NSLayoutConstraint!

    [...]

    override func viewDidLoad() {
        super.viewDidLoad()

        [...]

        arrangeConstraints()
    }

    [...]

    func arrangeConstraints() {
        [...]

        headerTopConstraint = headerContainerView.topAnchor
            .constraint(equalTo: view.topAnchor)
        headerHeightConstraint = headerContainerView.heightAnchor
            .constraint(equalToConstant: 210)
        let headerContainerViewConstraints: [NSLayoutConstraint] = [
            headerTopConstraint,
            headerContainerView.widthAnchor
                .constraint(equalTo: scrollView.widthAnchor, multiplier: 1.0),
            headerHeightConstraint
        ]
        NSLayoutConstraint.activate(headerContainerViewConstraints)

        [...]
    }

    [...]
}
Now that we have set and captured the required constrains, inside arrangeConstraints(), let’s take a look at how we can implement the desired effect(s).
Step 2: Triggering the appropriate effect
As the user scrolls the following should happen:
-
Scrolling up: The header view and the content view (a
UILabelin this case) are moved up with a parallax effect. -
Scrolling down: The header view is scaled.
Here’s the code to implement the required behaviors:
extension MainViewController: UIScrollViewDelegate {
    func scrollViewDidScroll(_ scrollView: UIScrollView) {
        if scrollView.contentOffset.y < 0.0 {
            // Scrolling down: Scale
            headerHeightConstraint?.constant =
                Constants.headerHeight - scrollView.contentOffset.y
        } else {
            // Scrolling up: Parallax
            let parallaxFactor: CGFloat = 0.25
            let offsetY = scrollView.contentOffset.y * parallaxFactor
            let minOffsetY: CGFloat = 8.0
            let availableOffset = min(offsetY, minOffsetY)
            let contentRectOffsetY = availableOffset / Constants.headerHeight
            headerTopConstraint?.constant = view.frame.origin.y
            headerHeightConstraint?.constant =
                Constants.headerHeight - scrollView.contentOffset.y
            headerImageView.layer.contentsRect =
                CGRect(x: 0, y: -contentRectOffsetY, width: 1, height: 1)
        }
    }
}
Let’s take a look at each effect in detail.
Step 2a: Scale effect
Implementing the Scale effect is relatively easy. When setting the constraints for the header view, in arrangeConstraints(), we:
- Captured a reference to the header view container height constraint
headerHeightConstraint = headerContainerView.heightAnchor.constraint(equalToConstant: 210)
- Set the header view container height/width ratio to 1
headerContainerView.widthAnchor.constraint(equalTo: scrollView.widthAnchor, multiplier: 1.0)
With the above constraints in place scaling the header is as simple as adjusting the height constraint by a value corresponding to the current vertical scrolling position:
// Scrolling down: Scale
headerHeightConstraint?.constant = Constants.headerHeight - scrollView.contentOffset.y
The current scrolling position is actually subtracted because when scrolling down its value is negative.
Step 2b: Parallax effect
Implementing the Parallax effect is a bit more complicated. As the user is scrolling up we want both the header view and the content view below it to scroll up at different speeds.
Here’s the code to implement the Parallax effect:
// Scrolling up: Parallax
let parallaxFactor: CGFloat = 0.25
let offsetY = scrollView.contentOffset.y * parallaxFactor
let minOffsetY: CGFloat = 8.0
let availableOffset = min(offsetY, minOffsetY)
let contentRectOffsetY = availableOffset / Constants.headerHeight
headerTopConstraint?.constant = view.frame.origin.y
headerHeightConstraint?.constant = Constants.headerHeight - scrollView.contentOffset.y
headerImageView.layer.contentsRect =
CGRect(x: 0, y: -contentRectOffsetY, width: 1, height: 1)
Let’s examine it in detail.
First, we perform some calculations to calculate the offset required to create the effect:
let parallaxFactor: CGFloat = 0.25
let offsetY = scrollView.contentOffset.y * parallaxFactor
let minOffsetY: CGFloat = 8.0
let availableOffset = min(offsetY, minOffsetY)
let contentRectOffsetY = availableOffset / Constants.headerHeight
Then, we complete the task by:
- Making sure that the header view container top constraint stays at the top of the visible view
headerTopConstraint?.constant = view.frame.origin.y
- Adjusting the header view container height constraint by a value corresponding to the current vertical scrolling position
headerHeightConstraint?.constant = Constants.headerHeight - scrollView.contentOffset.y
- Moving the header view image up by a value proportional to to the current vertical scrolling position
headerImageView.layer.contentsRect = CGRect(x: 0, y: -contentRectOffsetY, width: 1, height: 1)
Conclusion
You can find the full code for this article here.
In this post I illustrated how to leverage Programmatic Views and Programmatic Autolayout for brand new projects and suggested a few best practices on how to structure the code to make it clean and easy to read (and extend). I also implemented a basic Parallax and Scale effect for a view controller header to give an overview on how it’s possible to implement complex UI behavior in a purely programmatic way.